
How to Send Invitations to a Team Audience
Invitations let you distribute a survey to a known list of recipients by email. Each recipient receives a unique link (/v2/{surveyId}/i/{token}), allowing you to track delivery, opens, starts, and submissions in the Progress tab and send automated or manual reminders — while keeping survey answers completely unlinked from recipient email addresses.
Data Controller Responsibility
Your organization is the data controller of the recipient list; Accessible Surveys sends the invitations on your instruction. Before importing a CSV, you must confirm that your team has a lawful basis to contact those people and their permission to send them the survey. Purchased or scraped lists are not permitted.
Step 1: Prepare a Team Audience
Invitations go to a reusable team audience. Create the audience and populate it with recipients in the Customer Portal, then return here to send.
- How to Manage Team Audiences covers creating an audience, importing a CSV, mapping columns, reviewing the preview, accepting the warranty, and maintaining recipients.
The audience must belong to the same team as the survey. Importing does not send anything; it only builds the list you select below.
Step 2: Write the Invitation Email
Before you can send an invitation run, enable invitations on Share → Distribute (under Invitations, turn on Send email invitations) and configure the email subject and body on the survey's Email page.
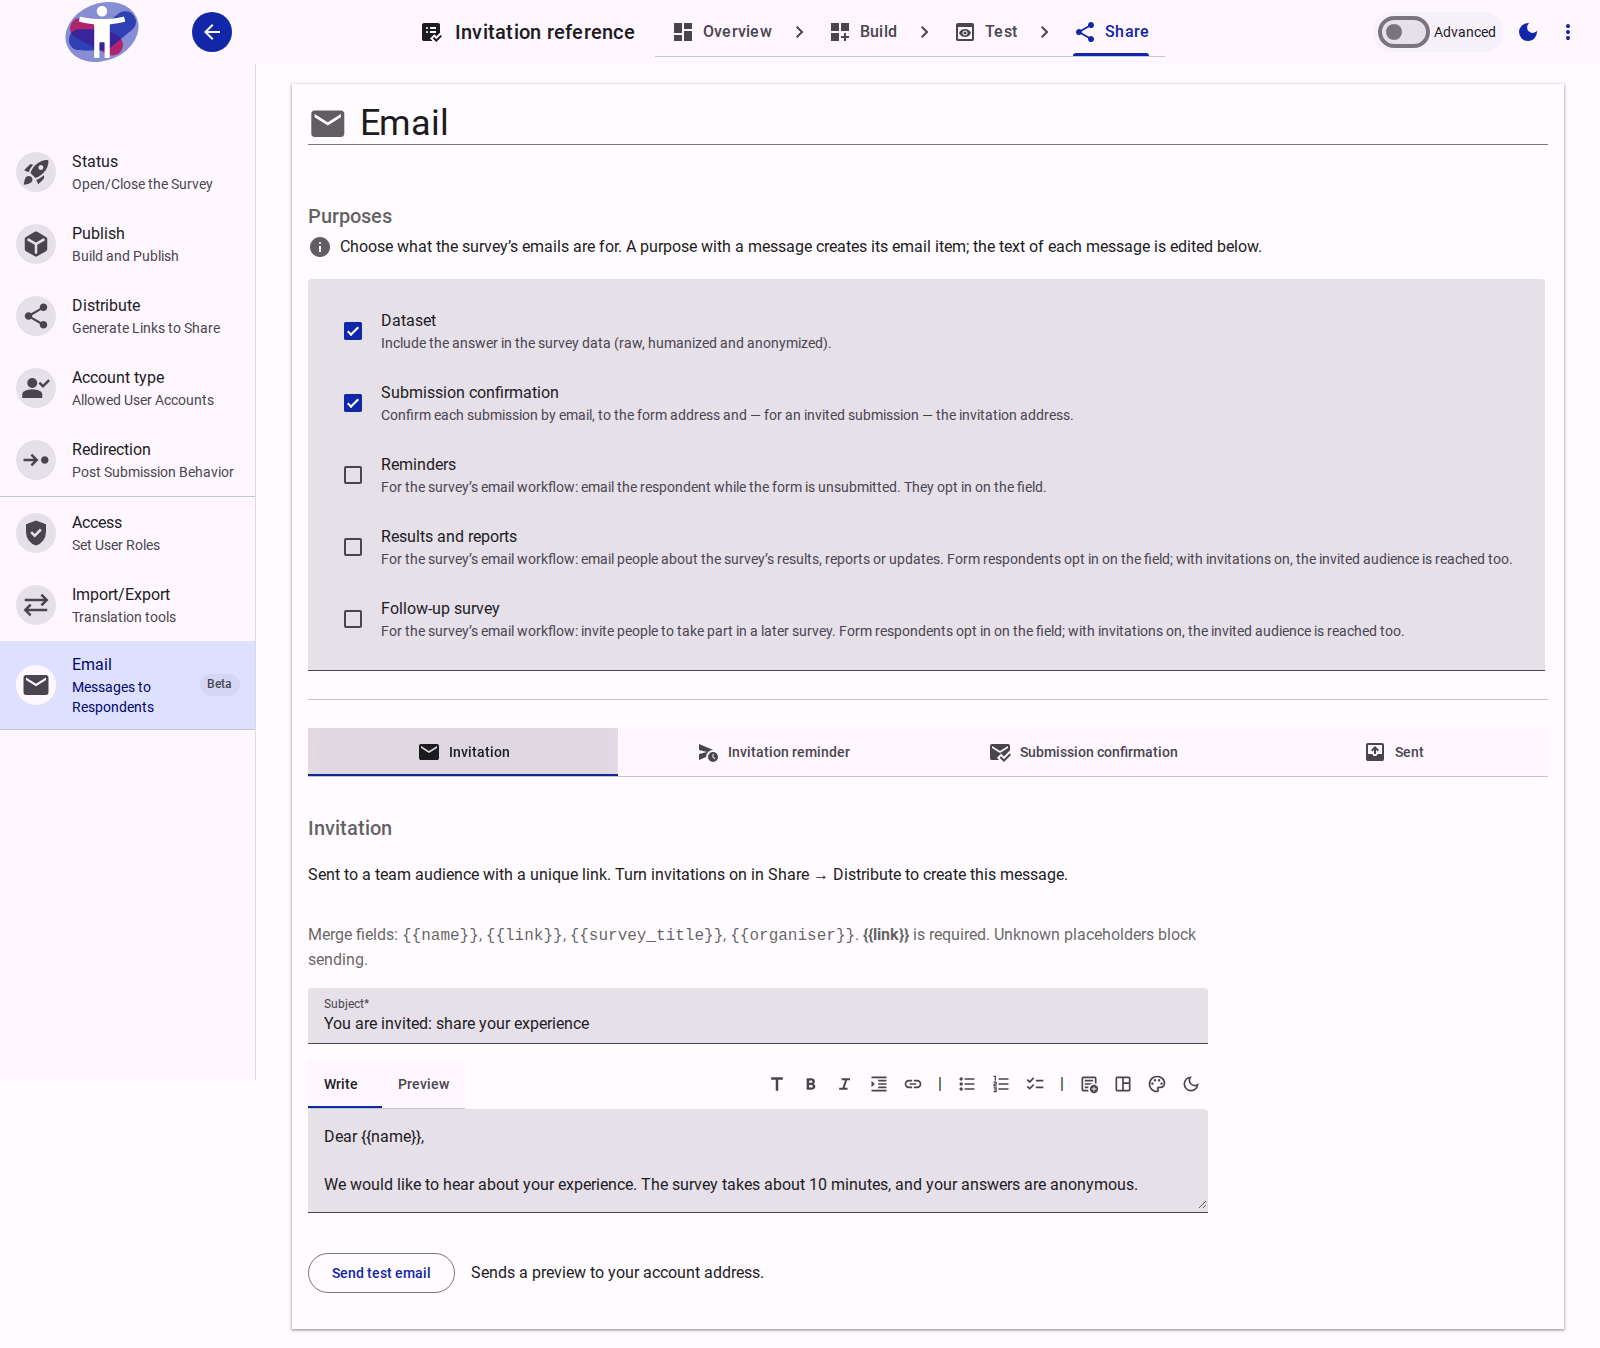
- Open your survey in the Survey Editor and go to Share → Email in the left navigation drawer.
- Select the Invitation tab (created when Send email invitations is turned on in Share → Distribute).
- Enter the invitation message in the survey's primary language:
- Subject: Plain-text subject line (up to 200 characters), for example
You are invited: share your experience. - Body: Markdown message body. Use the Preview tab above the editor to inspect the rendered formatting.
- Subject: Plain-text subject line (up to 200 characters), for example
- Include the required
{{link}}merge field in the message, along with any optional merge fields:{{link}}(required) — the recipient's unique survey URL (/v2/{surveyId}/i/{token}).{{name}}— the recipient's name from the audience record.{{survey_title}}— the title of the survey.{{organiser}}— your team's display name.
- On the Invitation reminder tab, optionally write a dedicated Subject and Body for scheduled or manual reminders, and set the default Reminder schedule (
No remindersto3 remindersand the days between them). If you leave the reminder message empty, reminders reuse the invitation email with aReminder N of M:prefix. - If your survey is multilingual, open Build → Compose, switch on Localize Mode, expand the Email group in the tree, and translate the Invitation (and Invitation reminder) item into each language your audience uses — or run the Translate action. Recipients whose language has no valid translation automatically fall back to the survey's primary language.
Mandatory Footer and Validation
The platform automatically appends the organizer attribution, a link to the privacy policy, and a one-click unsubscribe link to every invitation and reminder. Missing {{link}} or using an unknown {{placeholder}} blocks sending.
Step 3: Send a Test Email
Before inviting your audience, verify how the email looks in an inbox.
- Below the editor on the Invitation tab (or any other message tab) on the Email page, click Send test email.
- The platform sends a rendered preview of the email to the address of your signed-in account and displays a Test email sent. notification.
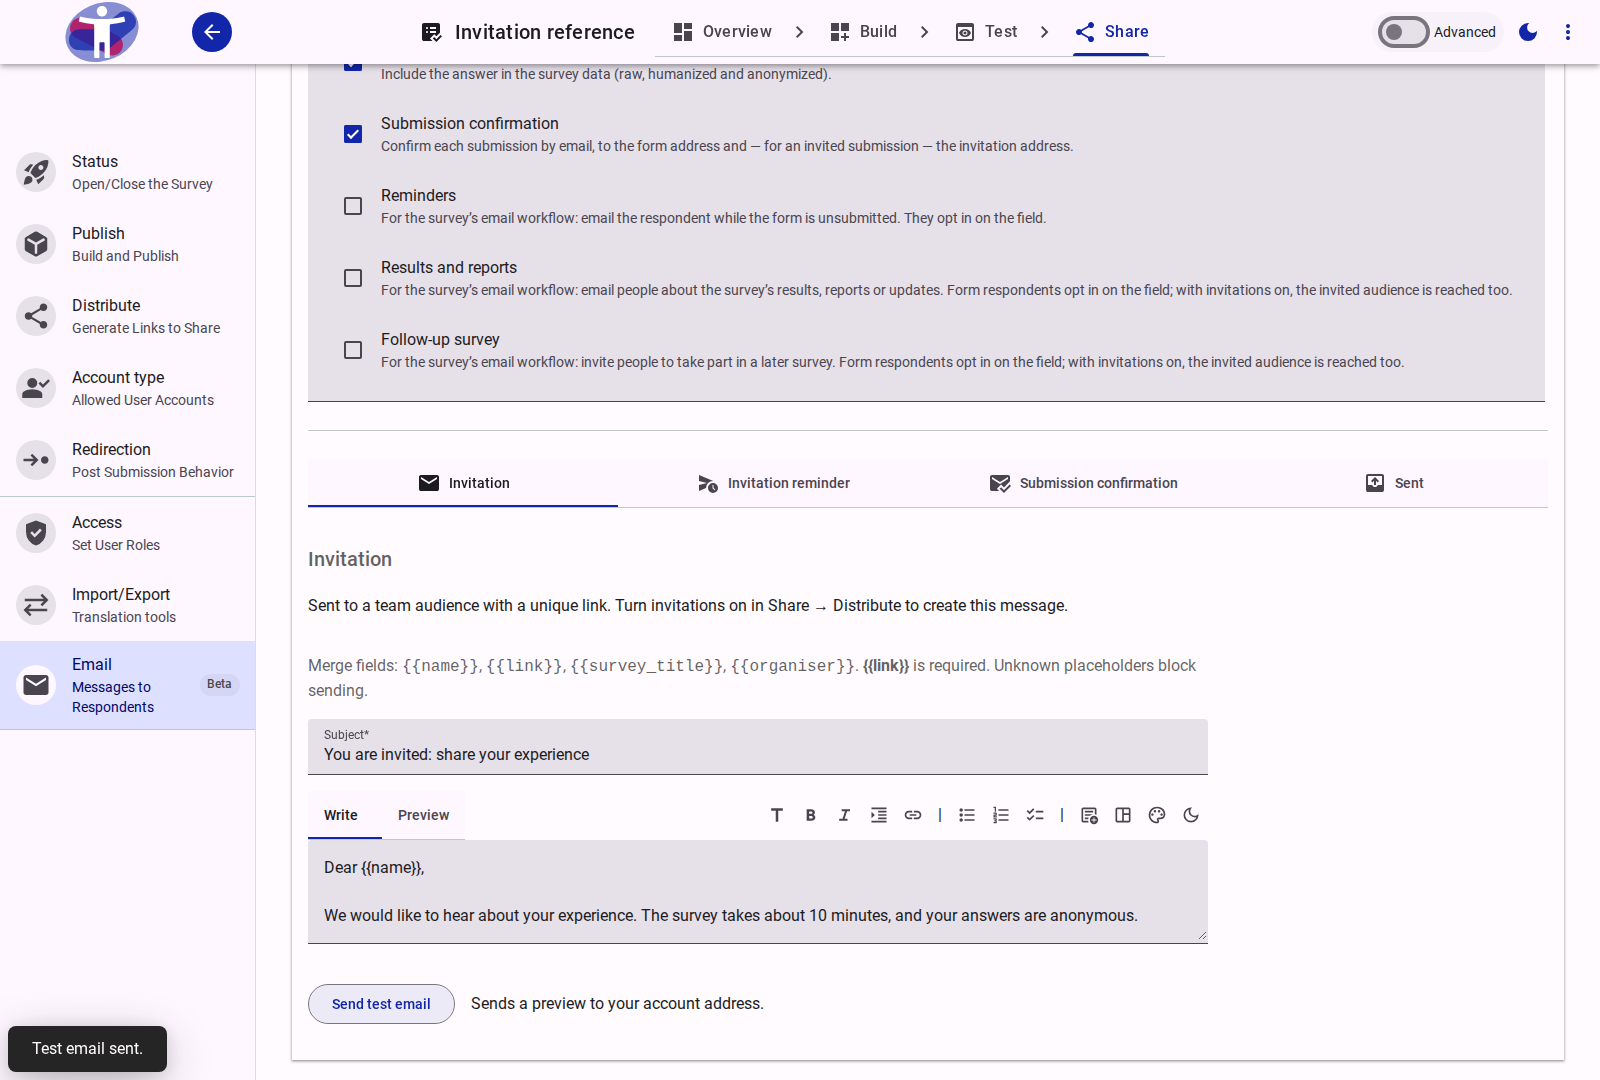
Sending a test email does not create an invitation run, does not generate a live respondent token, and does not count toward recipient statistics.
Step 4: Send Invitations from Distribute
Once your invitation email is ready, launch the invitation run from the Distribute page.
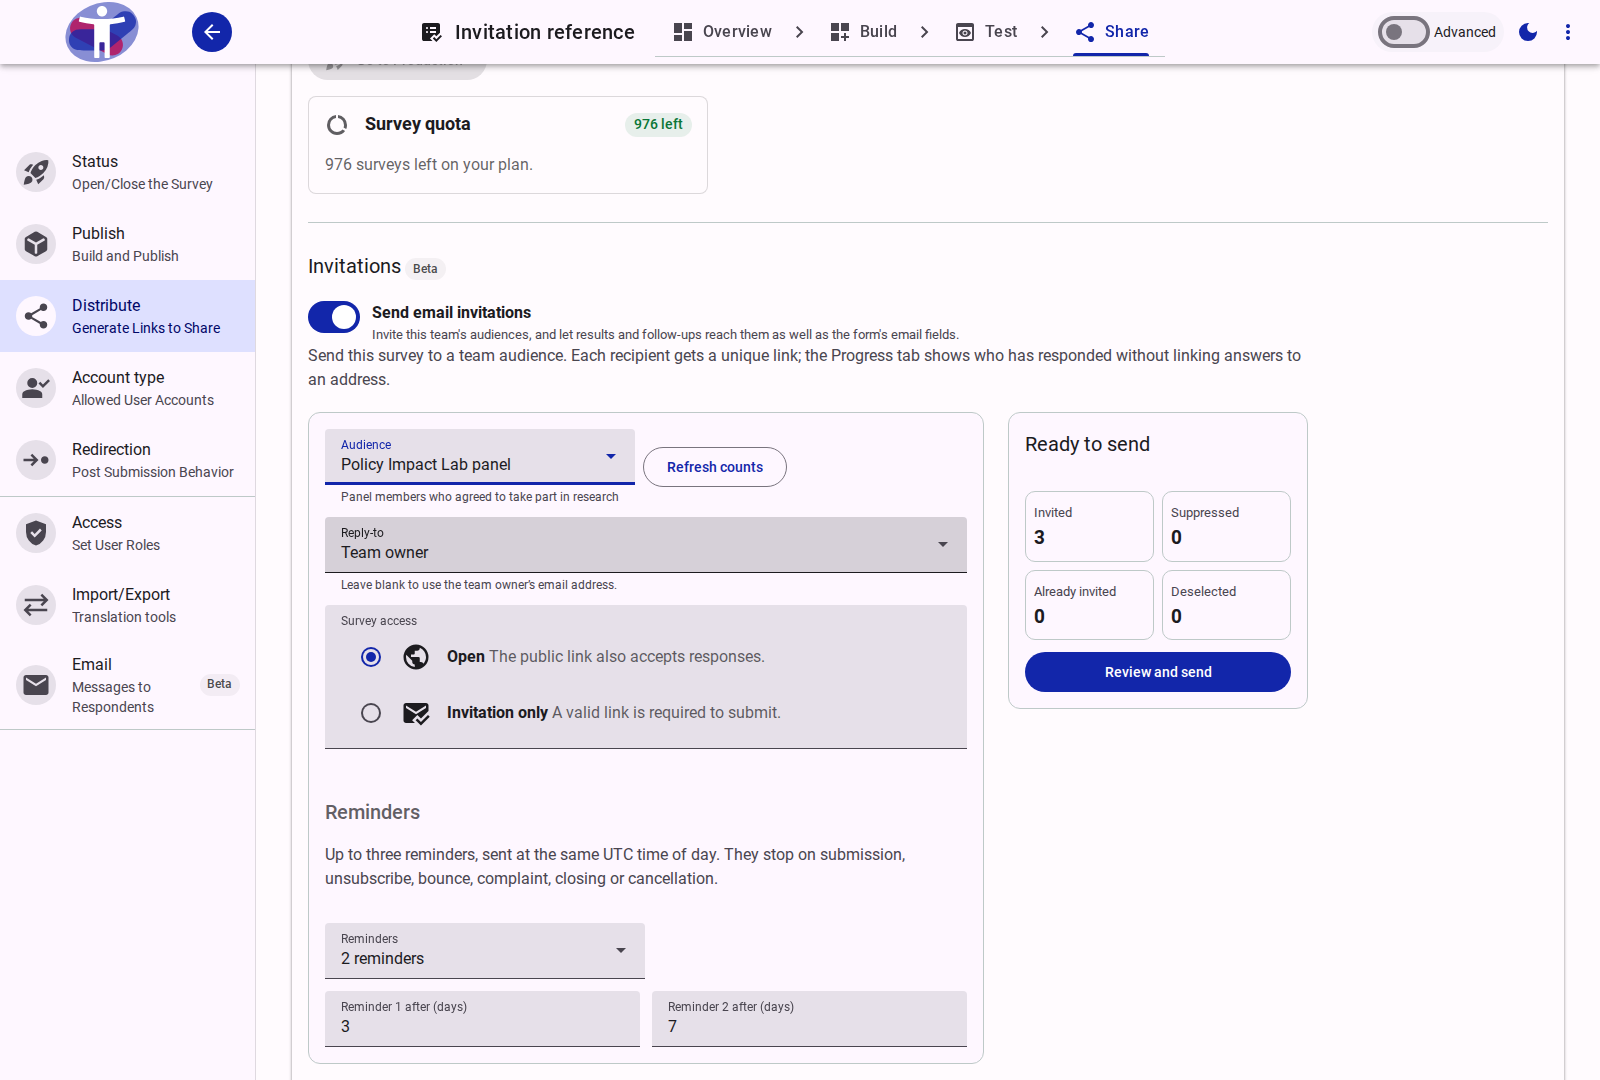
- In the Share navigation drawer, click Distribute and scroll to the Invitations section.
- Select your target list from the Audience dropdown (for example,
Policy Impact Lab panel). Click Refresh counts at any time to re-evaluate the audience. - Under Reply-to, choose the team member who should receive replies to the invitation, or leave it blank to use the team owner's email address. Choosing a member stores that address with the invitation run, so later changes to the team membership do not rewrite it.
- Choose the Survey access mode:
- Open: Both unique invitation links and the public survey link accept responses.
- Invitation only: Only respondents opening a valid invitation link can submit the survey.
- Under Reminders, choose how many automated reminders to send (
No reminders,1 reminder,2 reminders, or3 reminders) and set the delay in days after the previous send (for example,3days for Reminder 1 and7days for Reminder 2). - Check the Ready to send summary panel on the right, which breaks down the audience into:
- Invited: Eligible active recipients who have not yet been invited to this survey.
- Suppressed: Recipients on the organization-wide suppression list (excluded).
- Already invited: Recipients who already received an invitation in an earlier active run of this survey (excluded).
- Deselected: Excluded memberships.
- Click Review and send.
- In the Send invitations? confirmation dialog, review the final recipient count, exclusion summary, and language fallback notice, then click Send.
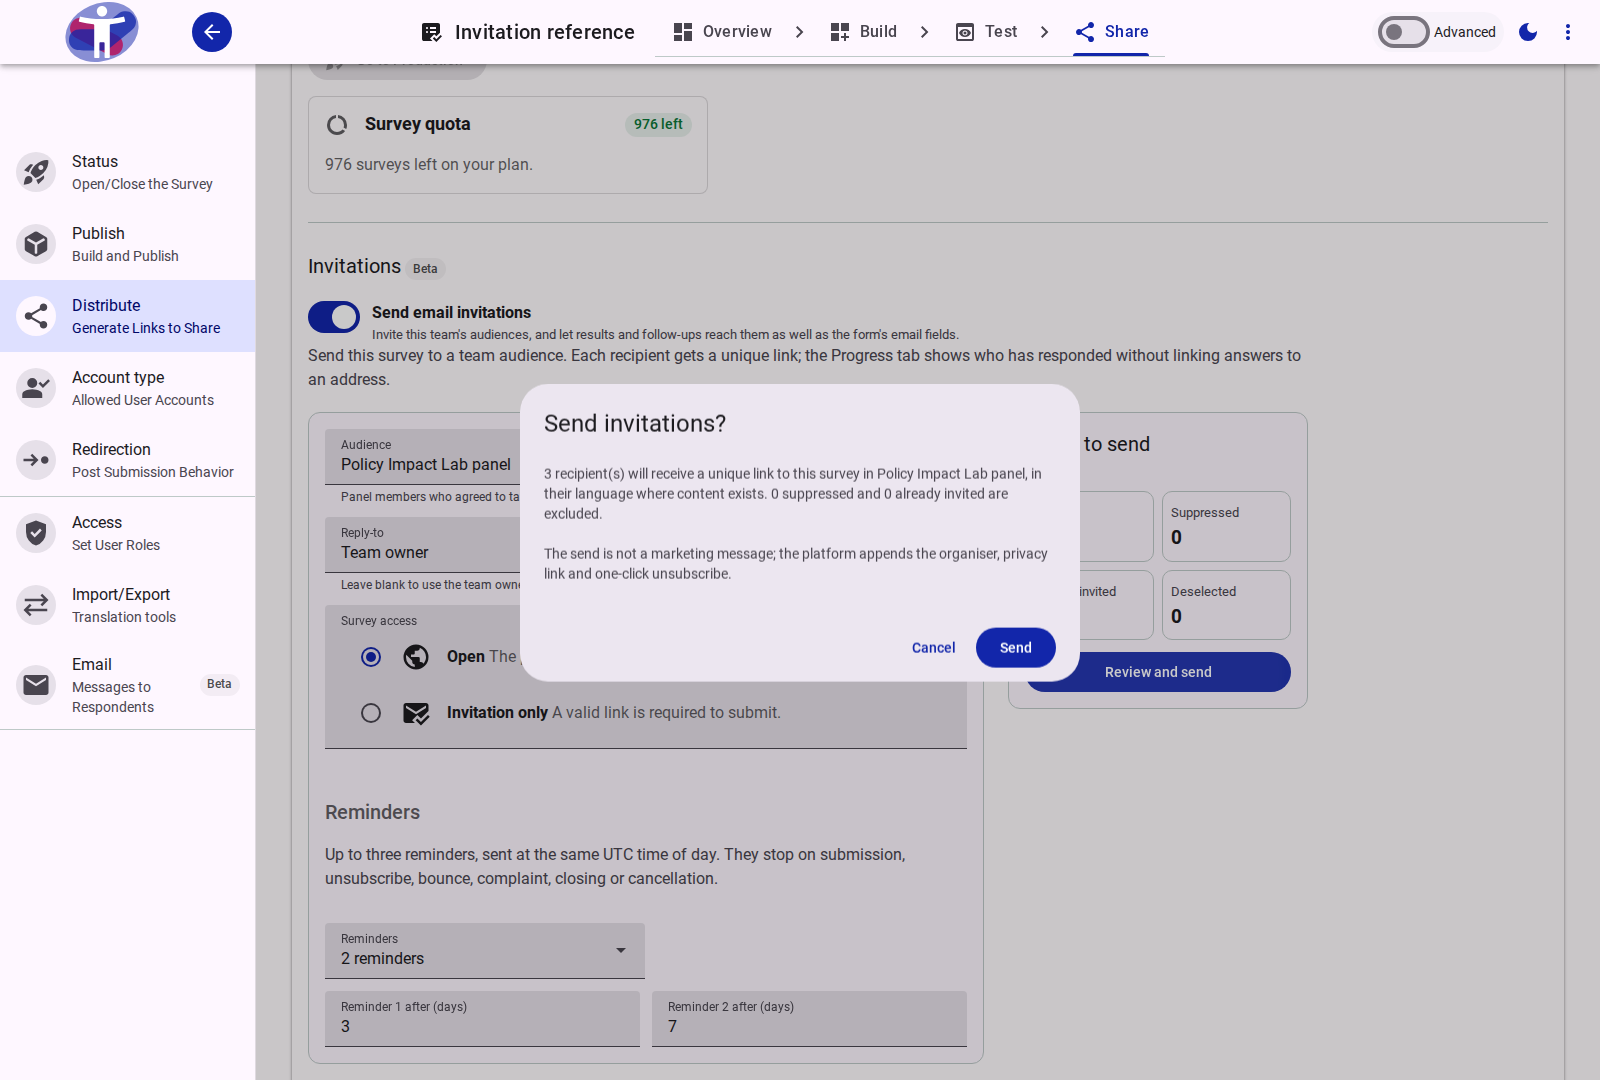
An invitation run freezes its recipient set at creation time: later edits to the team audience do not retroactively add or remove recipients from an existing run.
Step 5: View Progress and Manage Recipients in Analytics
As soon as the run starts sending, the app opens Analytics → Progress (/s/analyze/survey/{surveyId}/progress/progress).
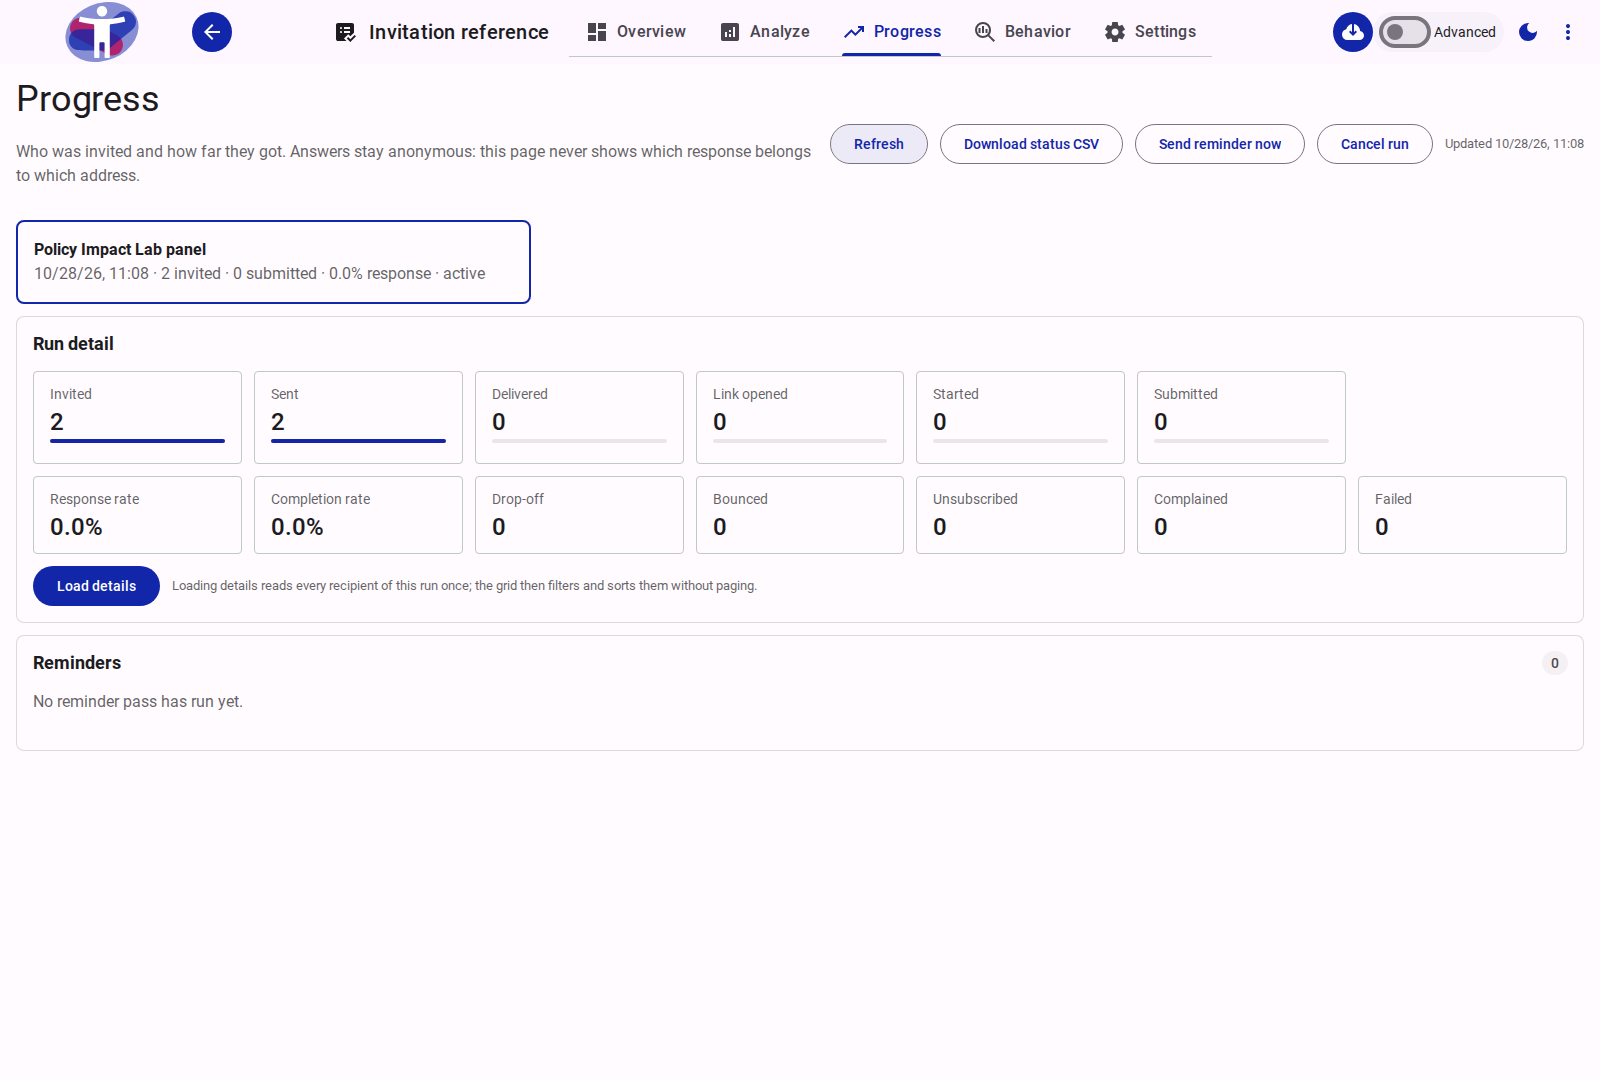
1. Monitor the run funnel and rates
- At the top of the Progress page, select the run card (for example,
Policy Impact Lab panel) if your survey has multiple invitation waves. - Review the Run detail metric tiles:
- Funnel stages:
Invited,Sent,Delivered,Email opened,Survey started,Started answering, andSubmitted. - Rates and delivery outcomes:
Response rate(Submitted ÷ Invited),Completion rate(Submitted ÷ Started answering),Drop-off(Started answering − Submitted),Bounced,Unsubscribed,Complained, andFailed.
- Funnel stages:
- Use the top toolbar actions to manage the run:
- Refresh: Reloads the latest funnel counts and recipient statuses.
- Download status CSV: Exports the run's delivery and participation statuses with masked email addresses.
- Send reminder now: Checks how many recipients are currently eligible for a manual reminder and prompts for confirmation before sending.
- Cancel run: Immediately deactivates invitation links that have not landed and stops any remaining batches or scheduled reminders.
- Check the Reminders card at the bottom of the page for a log of every scheduled and manual reminder pass (
Pass,When,Who,Sent, andFailed).
2. Inspect per-recipient details and take individual actions
- Inside the Run detail card, click Load details to fetch the per-recipient status rows.
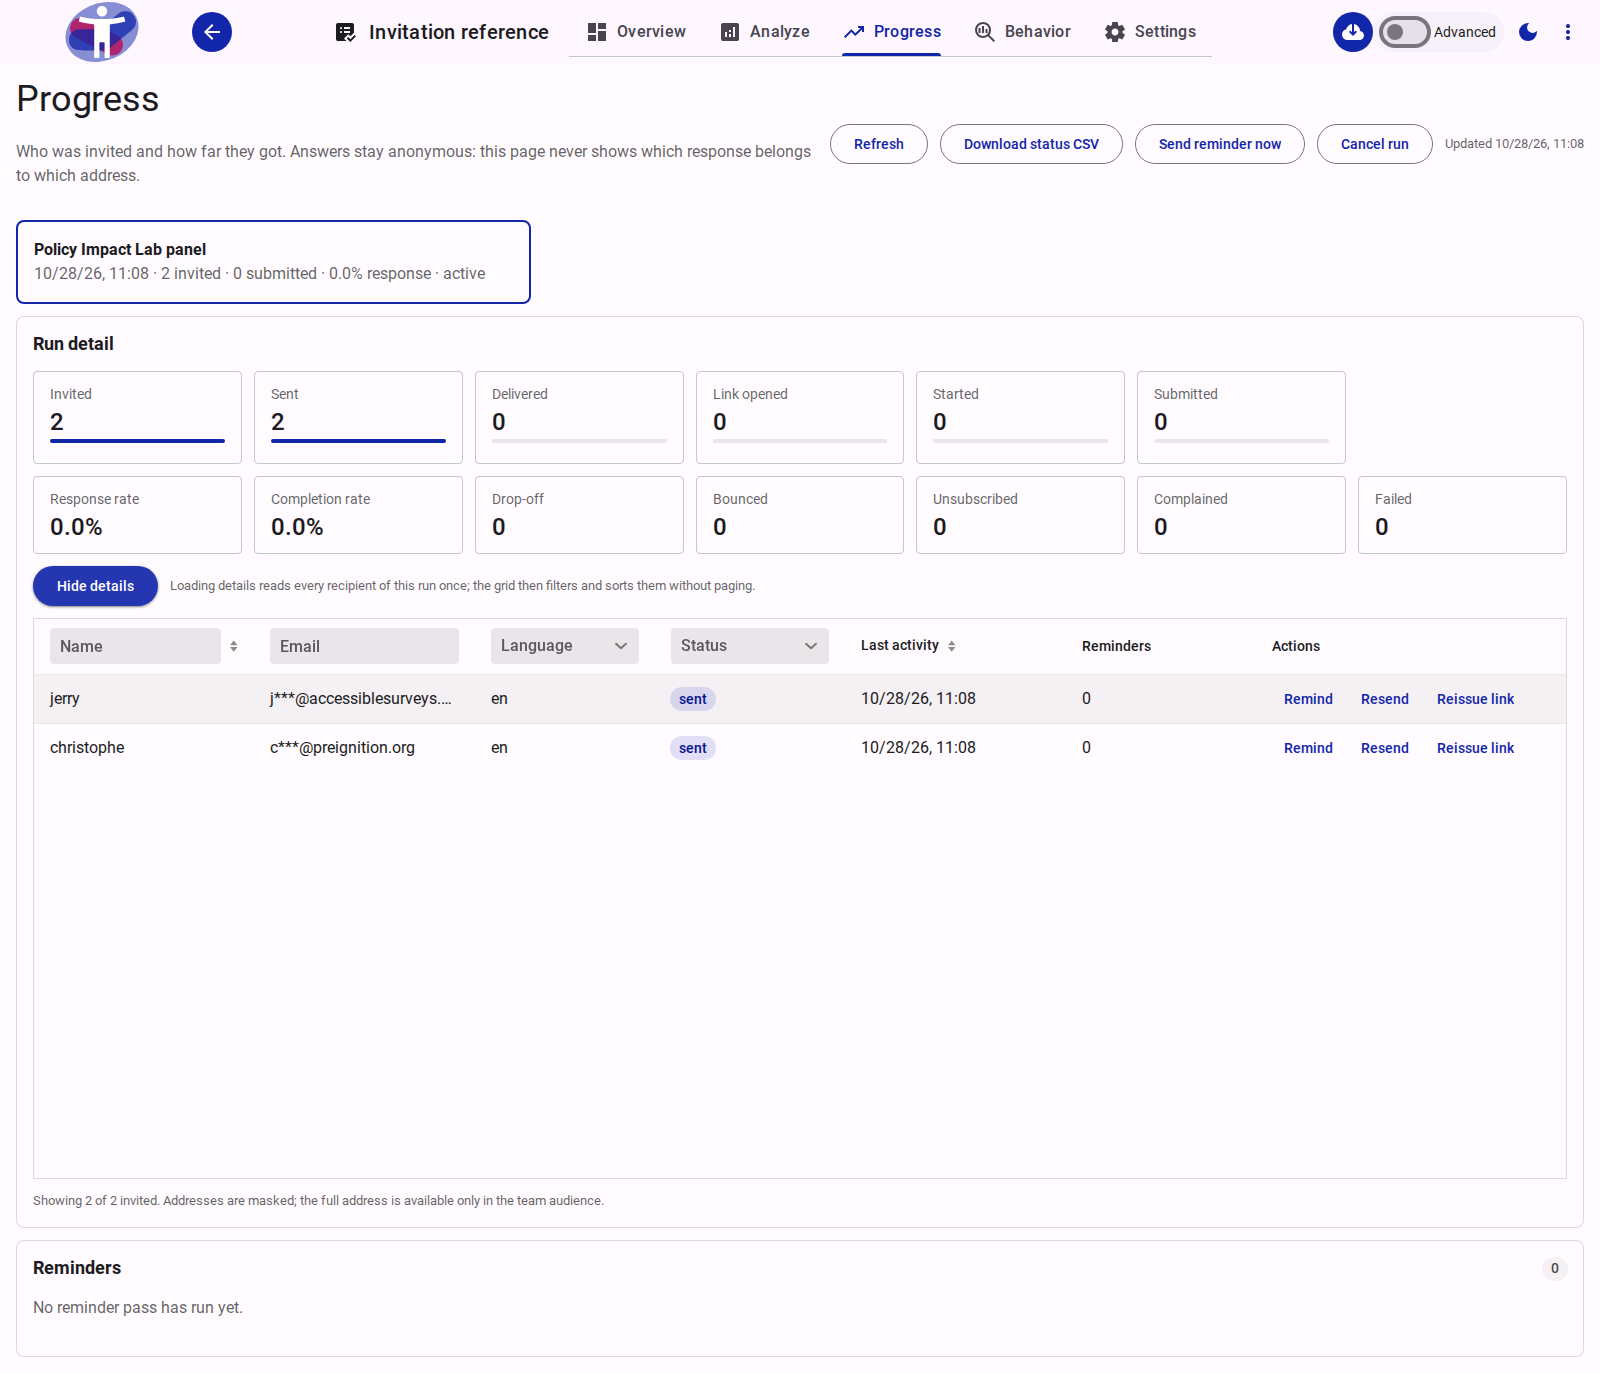
- Filter or sort the recipient table using the column headers:
- Name: Text filter and column sorter.
- Email: Text filter on the masked address (for example,
j***@accessiblesurveys.comorc***@preignition.org). Full addresses are never shown in survey analytics. - Language: Dropdown filter by recipient language code.
- Status: Dropdown filter (
Invited,Sent,Opened,Started,Submitted,Unsubscribed,Bounced,Complained,Failed). - Last activity: Sortable timestamp of the most recent lifecycle event.
- Reminders: Number of reminders sent to that recipient (and any failed attempts).
- Use the row Actions on any non-terminal invitation:
- Remind: Sends a single manual reminder to that recipient (subject to a 24-hour cooldown, up to 2 manual reminders and 5 total reminders per recipient).
- Resend: Re-sends the invitation email using the existing link.
- Reissue link: Immediately invalidates the previous token, generates a fresh unique link, and emails it to the recipient.
Privacy and Anonymity Boundary
The Progress view tells you whether a recipient has opened, started, or submitted the survey, never which answers they gave. No invitation ID, token, email address, or audience membership is ever written into response documents or survey data exports.
Related Content
- How to Manage Team Audiences — Creating and populating the audience this guide sends to
- Team Audiences Reference — Specifications for team audiences, CSV import rules, and recipient management
- Email Configuration Reference — Reference for the Invitation tab, merge fields, and respondent email purposes
- Distribute Your Survey Reference — Reference for the Invitations composer, access modes, and Link Builder
- Invitation Progress Reference — Reference for the Progress funnel counters, statuses, and run actions
- Data Privacy and Security — How invitation records, masked addresses, and customer-wide suppressions protect respondent privacy
- Publishing a Survey — How to build and take a survey to production