How to use form logic
Adding logic to a form enables you to customize how your form behaves when respondents are filling it in. This guide shows you how to write, apply, and test logical expressions.
What is a logical expression?
Logical expressions are mathematical expressions that return a result of either "True" or "False". A defined action is then applied depending on the result.
- For Pages and Sections, form logic is used to control whether they are visible or hidden.
- For Questions, 'required', 'invalid', and 'read-only' attributes can also be applied in addition to the 'hidden' attribute.
Step-by-step: Writing a logical expression
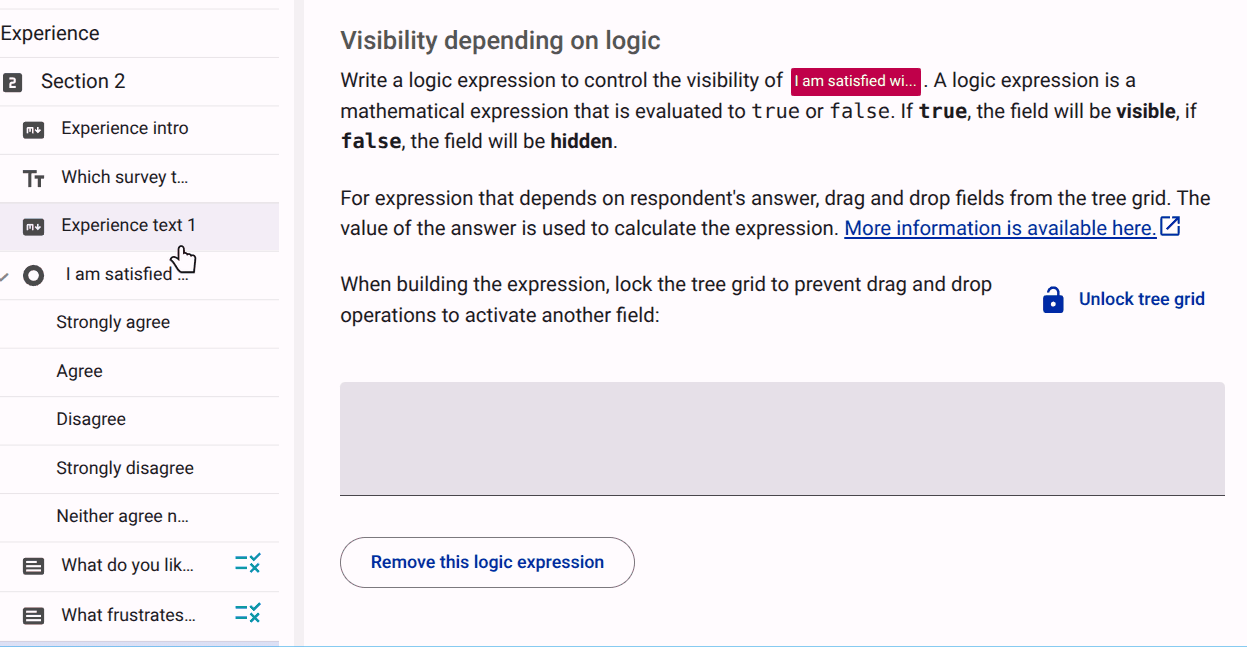
Follow these steps to add logic to your form (e.g., hiding a follow-up question if the answer to a previous question is 'No').
Step 1: Activate the visibility mode
In the Compose view, activate the relevant logic mode for your needs. For this example, we will use Visibility Mode to hide a question.

Step 2: Select the item
In the tree grid on the left, click on the specific item (Page, Section, or Question) that you want to apply the logic to.
Step 3: Create the logical expression
Click the button to create a new logic expression for the selected item.

Step 4: Lock the tree grid
To avoid accidentally clicking on other items while dragging and dropping elements, lock the tree grid.

IMPORTANT
Always select the option to lock the grid while editing logic to prevent losing your work.
Step 5: Write the expression
Write the logic expression by dragging and dropping the different elements (e.g., a previous question and its answer options) from the tree grid into the expression field. You will see the expression being built in real-time.
- For example, drag the question 'Do you like fruit?' and the answer 'No'.
- Enter an equals sign (
==) to set up the mathematical expression (i.e.,Do you like fruit? == No). - If the respondent answers 'No', the expression evaluates to 'True' and the item is hidden.
Step 6: Test the logical expression
It is important to test your expression to ensure it gives the desired outcome. Click the 'Test the Current Expression' button. This will bring up a mock view of the questions referenced in your logic.

Step 7: Finish and unlock
Once you are satisfied, unlock the grid so you can continue editing other parts of the form. If you made a mistake, you can remove the expression entirely.

Available Logic Operators
A wide range of logic options are available. The most commonly used are:
| Operator | Symbol |
|---|---|
| Equal | == |
| Not equal | != |
| Greater than | > |
| Greater than or equal | >= |
| Less than | < |
| Less than or equal | <= |
| Element in array or string | in |
| Logical AND | && |
| Logical OR | || |
| Negate | ! |
Tips for applying form logic
- Apply logic to the highest possible level: If you have multiple questions that should follow the same logic, place them in a Section and apply the logic to the Section rather than each individual question.
- Invert complex expressions: When writing complex logic, it is sometimes easier to create an expression that evaluates to 'True' and then invert it using
!(expression). - Lock the grid: Always lock the question while editing logic and unlock it when you are finished.